Sunday 12 October 2008

Queen of Jupiter

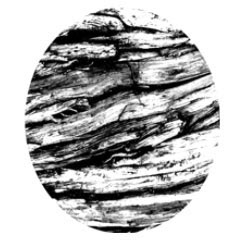
This is a textured brush created from a photo of the bark of an ancient tree in the back gardens of the Forbidden Palace in Beijing. The origin of the tree is a nice little trivia, but what I found interesting was the rough texture.


Photoshop's feature for creating custom brushes is a very powerful tool, but I still don't know how to fully utilise it. I created this wood grain brush as something to play around with and ended up using it in a somewhat unconventional way.
This picture was created exclusively using the wood grain brush and a simple palette of black and white.
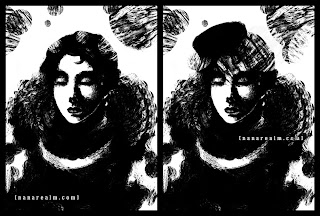

Usually I use brushes which have the 'Other Dynamics' box ticked in the brush settings, which allows some opacity variation for blending. However, I noticed that it damped the texture effect of the brush so I decided to leave it unticked. As a result every dab of the brush gives full opacity, i.e. black or white.
These were the settings I used for the brush. The only thing I varied as I got going was the Master Diameter, and occasionally the Spacing.
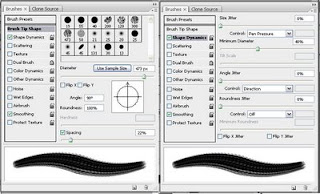

The main features of this brush is no opacity jitter and wide spacing, which makes sure that the texture comes through. It's also slightly oval, which gives some direction in the stroke. For example, the lace of her collar was done in a single stroke. Makes it seem simple doesn't it?
The time-consuming part was the face, since you can't be too rough while still making it look like a face.
Instead of using the brush in a conventional manner, I used it more like a sponge, creating shades by dabbing blacks and whites. By varying the brush size, the density of the 'holes' in the dab would change and I could thus lay down different tones. Then I would chip away with dabs of the opposite colour to refine the shape.
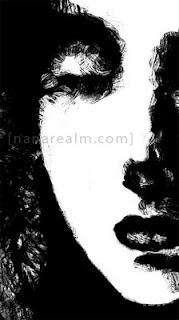


It may seem like a somewhat convoluted method, and sometimes it was quite difficult to get the right, but the end result was interesting enough to make it worthwhile.

Thursday 2 October 2008

Visualising in 3D vs. memorising lines - Part 2

A member on the Sweatdrop forums was asking how to draw the head from a low-angle view. I drew two examples of how I tend to approach this particular pose.


The example to the left keeps the normal, frontal-shot face shape. The only thing that happens is that the facial features are shifted upwards so that the chin becomes larger, and the underside of the nose becomes more prominent. The second example illustrates the tilting of the jaw and tends to look more extreme than the previous method.
The first example is an approach which I was able to do from very early on, but it took a few years before I could use the second method.
I learnt the first method by copying other people's work without really understanding the underlying principles. The tilted jaw line was more difficult to reproduce by copying however, so I was only able to use it to good effect once I could visualise the 3D form of the head.

It would seem that the 3D approach is far superior than the line approach, but if we look more closely, the two may not be totally unrelated.
Someone able to draw a face/pose without guidelines might have learnt how to draw using the line memorising approach, but, it could also be that they're so used to drawing that face/pose that they've moved past the need to construct in 3D. They know what the form looks like from any angle because they have already worked out the 3D problem multiple times, so they can now jump straight to the solution - the lines.

So, what's the difference between memorising other people's line patterns versus working things out yourself and then, when you're comfortable enough, use the line patterns you've learnt?
I believe the main difference is called your personal style.

Visualising in 3D vs. memorising lines - Part 1
Related post: The art of copying

Wednesday 1 October 2008

Visualising in 3D vs. memorising lines - Part 1

A while back I went to a manga-drawing workshop by the wonderful Emma Vieceli and Laura Watton. One of the many interesting things that were mentioned was related to how many of us approach drawing a figure.
We will take another look on the often somewhat controversial topic of copying which I've talked about in a previous post, and compare it to the "proper" way of learning to draw - visualising 3D form on paper.

When learning to draw people, folds, hair etc. by copying the line drawing of an existing artwork, certain line patterns are memorised. However, little knowledge is gained about the underlying 3D form which creates those characteristic lines. That means that you will most likely only be able to draw a pose from the particular angle that you copied it from.
I can't remember exactly what Emma and Laura called this kind of way to think about drawing, but let's call it the line approach for simplicity.

The other, usually more useful approach is the ability to visualise the form in 3D and translate that into a 2D line drawing. This takes a bit more time to learn since it's about learning to think rather than simply memorising lines, but it is an important, if not essential skill to learn.
By being able to visualise in 3D, it's possible to solve more complex poses and makes you more flexible as an artist.
The 3D approach is what is encouraged when how-to-draw books tell you to use spheres, cyliners and blocks to build up your figure. While it may be easy to draw geometrical shapes on paper, understanding the angle and depth relationships between blocks and being able to translate that into a human form takes some time.

Related post: The art of copying